Technique & Science
Why Steam Matters When Baking Bread (and How to Create It at Home)
Steam in the first 15 minutes keeps your crust soft so the loaf can expand fully. Here is the science and four practical methods for a home oven.
Steam in the first 15 minutes of a bake is one of the biggest factors separating a loaf with a good rise and a glossy, crackly crust from one that comes out squat and pale. Once you understand what it is actually doing, every steaming method makes more sense.
The Science Behind Steam When Baking Bread
When you load a shaped loaf into a hot oven, two things happen at once. The yeast or starter gets one last burst of activity from the heat before it dies off, generating gas and pushing the dough upward. At the same time, the outer surface of the dough starts to dry out and set into a crust.
The problem is that a crust forming too quickly acts like a lid. It locks the loaf into whatever shape it has at that moment, preventing the gas inside from pushing the dough further. The loaf stops expanding before it reaches its potential size.
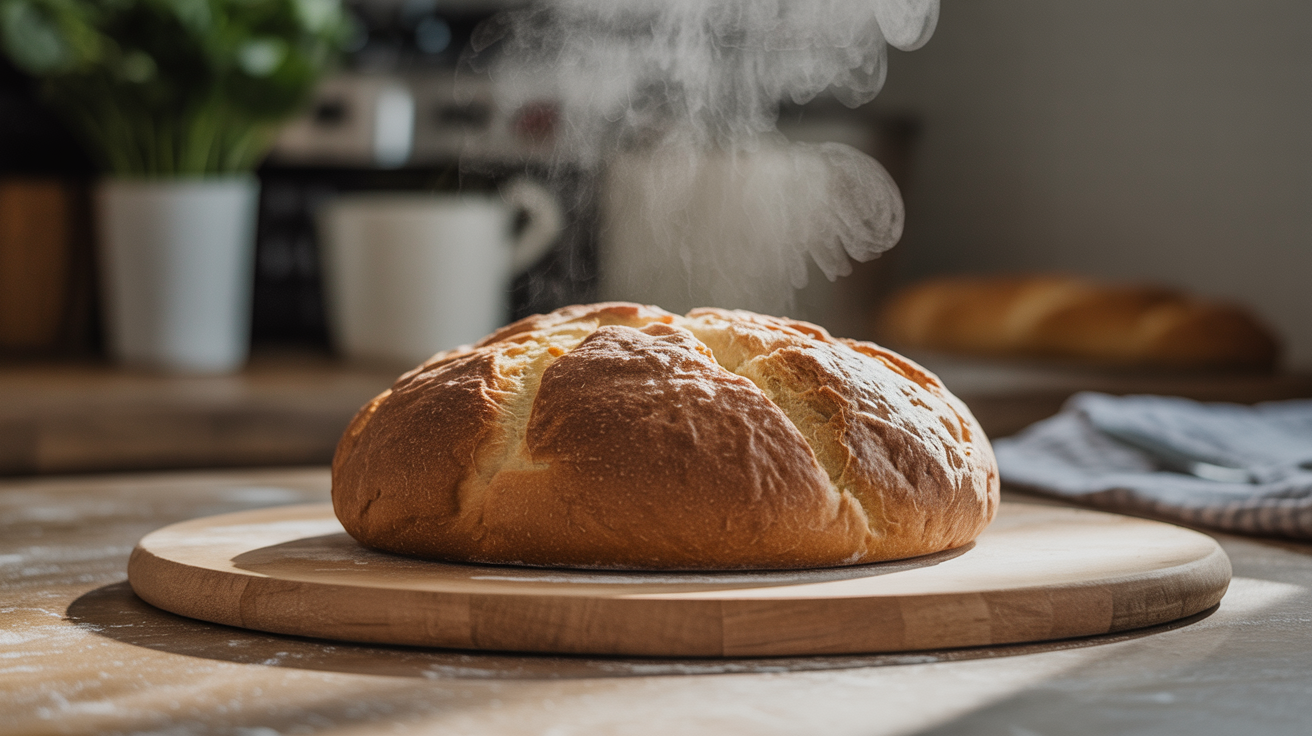
Steam solves this by keeping the surface of the dough moist. Moisture delays the moment when the crust sets, leaving the dough extensible and free to expand. Bakers call this oven spring: the rapid rise that happens in the first 10 to 15 minutes before the structure of the loaf solidifies.
After that window closes, you remove the steam source (or uncover the pot) and let dry heat take over. The crust then dries out quickly, browns through the Maillard reaction, and develops the colour and crispness you are aiming for.
A secondary benefit is shine. Steam gelatinises the starches on the surface of the loaf, which is part of what gives artisan bread that slightly glossy look before the crust fully browns.
Four Ways to Create Steam in a Home Oven
Home ovens are not built to retain steam the way professional deck ovens are. They vent constantly. That means you have to actively introduce moisture and keep it concentrated around the loaf for the first part of the bake.
Method 1: Dutch Oven with a Lid
This is the most reliable method for home bakers, and the one most beginners start with. You preheat a cast-iron Dutch oven inside the oven while the oven comes up to temperature (typically 230 to 250 C / 450 to 480 F). You then lower your shaped loaf into the pot and bake it covered for the first 20 minutes.
The lid traps the steam that the dough itself releases as it heats. You do not need to add water at all. After 20 minutes, remove the lid and bake uncovered for the remaining 20 to 25 minutes to brown the crust.
Pros: Consistent results, no extra setup, no splashing water near a hot oven, works well with free-form rounds and ovals.
Cons: The pot is extremely hot when you load the dough. You need good oven mitts and a plan for lowering the loaf in safely. It also does not work for sandwich-style loaves baked in a standard loaf pan.
For more on whether this tool is worth adding to your kitchen, see Do You Really Need a Dutch Oven to Bake Bread?.
Method 2: A Pan of Boiling Water on the Lower Rack
Place an empty metal roasting pan or cast-iron skillet on the lowest rack of the oven while it preheats. When you load your loaf, carefully pour about 240 ml (1 cup) of boiling water into the hot pan and quickly close the oven door. The water hits the scorching metal, flashes into steam immediately, and fills the oven cavity.
Some bakers slide a second tray of ice on the lower rack instead of using boiling water, letting it melt and steam more slowly. This can work, but boiling water tends to produce a faster, bigger burst of steam right when you need it most.
Pros: Works for any shape of loaf, including sandwich loaves in standard pans. No special pot required.
Cons: Pouring water into a 250 C oven is genuinely hazardous. Use a long-handled cup or ladle, wear heat-resistant oven mitts that extend up your forearms, and keep your face and body back from the door when you pour. Do not use a glass pan for this (thermal shock can shatter it). The steam that billows out when the oven door opens is hot enough to burn skin.
After 15 minutes, open the oven carefully, remove the steam pan, and let the remaining bake run in dry heat.
Method 3: Ice Cubes
A variation on the boiling-water method. Place a small cast-iron pan or metal tray on the lowest rack. When you load the loaf, throw a handful of ice cubes onto the hot tray and shut the door fast.
The ice melts and steams more gradually than boiling water, which some bakers find produces a gentler steam environment. The gradual release can be useful for enriched doughs that need a slightly softer steam, though for lean artisan loaves the difference is often hard to detect.
Pros: Easy to have on hand, less splashing risk than pouring water.
Cons: Still requires placing your hands near a very hot pan. The steam burst is slower and sometimes less concentrated than with boiling water. Wear protection and work quickly.
Method 4: A Spray Bottle
Fill a clean spray bottle with water. Load your loaf into the oven, give the walls and floor of the oven three or four good sprays, then close the door. Repeat once more after about 30 seconds if your oven allows.
This method produces the least reliable results of the four. Home ovens vent moisture quickly, and a spray bottle cannot put enough water into the oven to make a meaningful difference in most cases. It can be a useful supplement to one of the other methods, but as a standalone approach it often under-delivers.
Pros: No risk of burns from steam, no special equipment.
Cons: Results are inconsistent. Do not spray directly onto oven glass or light covers (thermal shock risk). Avoid spraying the heating element.
A Method Comparison at a Glance
| Method | Best for | Steam level | Safety note |
|---|---|---|---|
| Dutch oven lid | Round/oval free-form loaves | High, consistent | Hot pot: use sturdy mitts |
| Boiling water pan | Any loaf shape | High, fast burst | Burns risk: long-handled ladle, keep face back |
| Ice cubes | Any loaf shape | Medium, slower | Still hot pan: use mitts |
| Spray bottle | Supplement only | Low | Avoid oven glass and elements |
What Happens When You Skip Steam Entirely
Baking without steam is not a disaster, but it does change the loaf in predictable ways.
The crust sets earlier, which limits how much the loaf can rise in the oven. You lose some of the oven spring. The finished loaf is often shorter and denser in the crumb than it would have been with steam.
The crust itself will be thicker and chewier rather than thin and crackly. It also tends to bake paler because the surface dries out before the Maillard reaction has enough time to develop deep colour, and the starch-gelatinising effect that contributes to a glossy finish does not happen.
Scoring the loaf (making cuts on the surface before it goes in) matters more when you are baking without steam, because the cuts are the only other mechanism giving the loaf a controlled path to expand. Without steam to keep the surface extensible and good scoring to direct the rise, the loaf can tear unpredictably along its sides.
If your crust regularly comes out harder than you want or stays pale, steam is usually part of the answer. The guide on why your crust is too hard, too soft, or too pale covers other factors that play into crust texture and colour.
Frequently Asked Questions
How long should I use steam for? The steam window is the first 15 to 20 minutes of the bake. After that, you want dry heat to finish browning and crisping the crust. If you are using a Dutch oven, remove the lid at the 20-minute mark. If you are using a water pan, pull it out at around 15 minutes.
Does steam matter for sandwich loaves or only for artisan bread? Steam matters most for lean doughs (flour, water, salt, leavening) where you want maximum oven spring and a crackly crust. Enriched sandwich loaves that contain milk, butter, or eggs develop a softer crust naturally and often do not need steam. Some bakers skip it entirely for pan loaves.
Can I get a crunchy crust without a Dutch oven? Yes. The boiling-water-pan or ice-cube method can produce a good crust on a free-form loaf placed directly on a baking stone or steel. The results are slightly less consistent than a Dutch oven because the oven cavity is harder to keep steamy, but plenty of bakers get excellent loaves this way.
My oven fills with smoke when I pour water in. Is that normal? A small amount of steam and hissing is expected. Smoke usually means there are drips or crumbs on the oven floor burning off. Clean the oven floor before a steam bake to avoid this.
What temperature should my oven be for steam baking? Most lean artisan loaves go in at 230 to 250 C (450 to 480 F). The exact temperature depends on the recipe and the size of the loaf. Larger, denser loaves sometimes benefit from starting at a slightly lower temperature so the inside has time to cook through before the crust over-browns. Treat any number as a starting point and adjust based on what you see coming out of your own oven.