Yeasted Breads
Easy Homemade Dinner Rolls for Beginners
Make soft, fluffy homemade dinner rolls from scratch with this simple beginner recipe. Step-by-step guide with shaping tips, proof times, and storage.
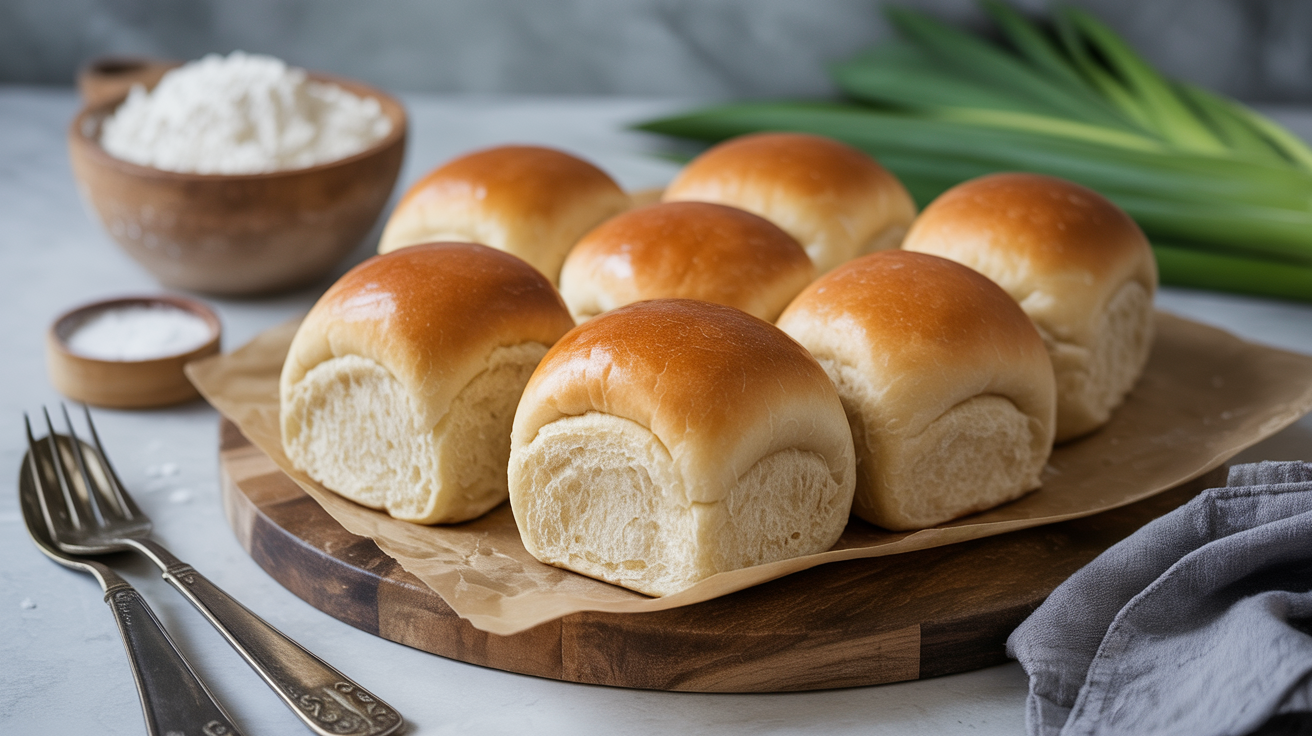
If you've never made bread before, dinner rolls are one of the best places to start. They're small, forgiving, and ready in just a few hours. A batch of pull-apart rolls straight from the oven, brushed with butter while still hot, is hard to beat at any dinner table.
This soft dinner rolls recipe uses a basic enriched dough (butter, milk, and egg go in), which is why they come out tender and pillowy rather than chewy like a baguette. You don't need a stand mixer, though one certainly helps. A bowl, a spoon, and two hands are enough.
What You'll Need
Ingredients
| Ingredient | Grams | Cups / Tbsp |
|---|---|---|
| Bread flour (or all-purpose) | 360 g | 3 cups |
| Whole milk, warm (about 38°C / 100°F) | 180 g | ¾ cup |
| Unsalted butter, softened | 56 g | 4 tablespoons |
| Granulated sugar | 25 g | 2 tablespoons |
| Fine salt | 7 g | 1¼ teaspoons |
| Active dry yeast (or instant yeast) | 7 g | 2¼ teaspoons (1 packet) |
| Large egg | 1 | 1 |
For the butter wash: 2 tablespoons (28 g) unsalted butter, melted.
Equipment
- 9x13-inch (23x33 cm) baking pan
- Large mixing bowl
- Bench scraper or sharp knife
- Kitchen scale (recommended) or measuring cups
- Instant-read thermometer (helpful but not required)
Making the Dough
Step 1. Warm the milk to around 38°C (100°F). It should feel pleasantly warm on your wrist, not hot. Pour it into a large bowl, sprinkle in the yeast and sugar, and stir briefly. Let it sit for 5 to 10 minutes. If you see a foam cap forming, the yeast is alive. If nothing happens after 10 minutes, your milk was likely too hot (it killed the yeast) or the yeast is past its best. Start over with fresh yeast.
Step 2. Add the egg and softened butter to the yeast mixture and stir until roughly combined. The butter won't fully incorporate yet; that's fine.
Step 3. Add the salt and flour. Mix with a spoon or your hand until a shaggy dough forms, then turn it out onto a clean surface and knead for 8 to 10 minutes. The dough is ready when it's smooth, slightly tacky, and springs back slowly when you poke it. With a stand mixer and dough hook, this takes about 6 minutes on medium speed.
Step 4. Shape the dough into a ball, place it back in the bowl (lightly greased), cover with plastic wrap or a damp towel, and leave it to rise at room temperature (around 21-24°C / 70-75°F) until doubled. This usually takes 1 to 1.5 hours.
The enriched dough used here (milk, butter, egg) rises a touch more slowly than a lean dough would, but those same fats are what give the rolls their soft, pull-apart crumb. If you enjoy working with this kind of dough, the same principle applies when you make soft sandwich bread at home.
How to Shape Even Dinner Rolls
Consistent sizing matters here. Rolls that vary in weight will bake unevenly: smaller ones overcook while larger ones stay doughy in the center.
Step 1. Grease your 9x13-inch pan lightly with butter or a neutral oil.
Step 2. Tip the risen dough onto an unfloured surface (a little tackiness helps you shape). Press it gently to deflate, then use a bench scraper or knife to divide it into 15 equal pieces. The easiest way: weigh the whole dough, divide by 15, and cut each piece to that weight. Aim for roughly 40-42 g per roll.
Step 3. To shape each piece: cup your hand over the dough with your palm facing down. Apply light pressure and move your hand in a small, firm circle. The surface tension you build by dragging the dough against the counter pulls the top smooth and tight. The bottom pinches together naturally. If the dough sticks to your hand, not the counter, add a tiny bit of flour. If it slides around freely, try a slightly damp surface.
Step 4. Place each roll seam-side down in the prepared pan, arranged in a 3x5 grid. Leave a small gap between each one (about 1 cm). As they proof and bake, they'll expand to touch, giving you that classic pull-apart result.
Proofing the Rolls
Cover the pan loosely with plastic wrap and let the rolls proof for 45 to 60 minutes at room temperature. They should look noticeably puffier and feel airy if you gently press one with a fingertip. The indent should slowly spring back about halfway. If it springs back fast, they need more time. If it doesn't spring back at all, they're slightly over-proofed (still bakeable, just a little denser).
About 20 minutes before the rolls are ready, preheat your oven to 190°C (375°F). Don't skip the preheat. The immediate heat as they go in helps them spring up properly.
Baking
Bake the rolls at 190°C (375°F) for 18 to 22 minutes. You're looking for a deep golden-brown top. If you have an instant-read thermometer, the center of the rolls should read at least 88°C (190°F) when done.
Pull them out of the oven and brush the tops immediately with the melted butter. The heat from the rolls absorbs the butter and keeps the crust soft rather than letting it firm up. This is the step that makes a soft dinner rolls recipe truly pillowy.
Let them cool in the pan for 5 minutes, then serve warm. They pull apart at the seams where they touched during baking.
Make-Ahead and Storage
Same-day make-ahead. After shaping the rolls and placing them in the pan, cover tightly with plastic wrap and refrigerate for up to 18 hours instead of proofing at room temperature. When you're ready to bake, pull them from the fridge, let them sit at room temperature for 30 to 45 minutes while the oven preheats, then bake as usual. This is useful for holiday dinners when oven and prep time are limited.
Freezing unbaked rolls. Shape the rolls, place them on a baking sheet (not touching), and freeze until solid (about 2 hours). Transfer to a freezer bag. They keep for up to 6 weeks. To bake from frozen: place in the greased pan the night before, cover, and let them thaw and proof overnight in the fridge. Bake the next day.
Storing baked rolls. Cool completely, then store in an airtight bag or container at room temperature for up to 3 days. To refresh: wrap a roll in a damp paper towel and microwave for 15 to 20 seconds. They won't be quite as good as fresh, but they'll be close.
Freezing baked rolls. Wrap cooled rolls individually, then bag them. Reheat from frozen in a 175°C (350°F) oven for about 10 minutes.
Once you're comfortable shaping and proofing rolls, you can apply the same feel for yeast dough to flatbreads. Homemade focaccia is a great next step because the dough is wetter and more relaxed, which teaches you a different side of yeast baking. And if you want to go in a completely different direction, homemade pizza dough uses a lean dough with no dairy or eggs, so you can compare how the texture differs.
Frequently Asked Questions
Can I use instant yeast instead of active dry yeast?
Yes. Swap them 1:1 by weight (or volume). With instant yeast, you can skip the proofing step where you wait for a foam cap. Just add it directly to the flour with the other dry ingredients, then add the wet ingredients. Rise times will be similar, sometimes a bit shorter.
Why didn't my rolls rise?
The most common reasons are yeast that's expired or was killed by milk that was too hot (above 43°C / 110°F destroys yeast quickly). A cold kitchen also slows the rise significantly. If your room is below 18°C (65°F), try placing the covered bowl in an oven with just the oven light on, or near a warm stovetop. The dough should feel noticeably warmer than your countertop when the environment is right.
Can I use all-purpose flour instead of bread flour?
Yes, and most home bakers do. All-purpose flour produces slightly softer rolls with a little less chew. Bread flour has more protein, which gives the rolls a bit more structure and a chewier pull. Both work well for this recipe.
How do I know when the rolls are done baking?
Look for a deep golden brown on top, not pale yellow. The bottom of the pan should sound hollow if you tap it. An instant-read thermometer reading 88-93°C (190-200°F) in the center is the most reliable check. If they're browning too fast on top before the time is up, tent the pan loosely with foil.
Can I make these rolls without dairy?
Yes. Substitute the milk with an unsweetened plant-based milk (oat or soy work well) and use a neutral oil or vegan butter in place of the butter. The rolls will be slightly less rich but still soft and easy dinner rolls to work with. The butter wash at the end can also be swapped for a plant-based alternative or a light coating of olive oil.