Yeasted Breads
How to Make Bagels at Home
A step-by-step guide to homemade bagels from scratch: high-protein flour, stiff dough, the boil, and baking temps that deliver real chew.
Making bagels at home takes a bit more hands-on time than a standard loaf, but the process is straightforward once you understand the three things that set them apart: stiff dough, a brief boil, and a hot oven.
What Makes a Bagel Different From Other Breads
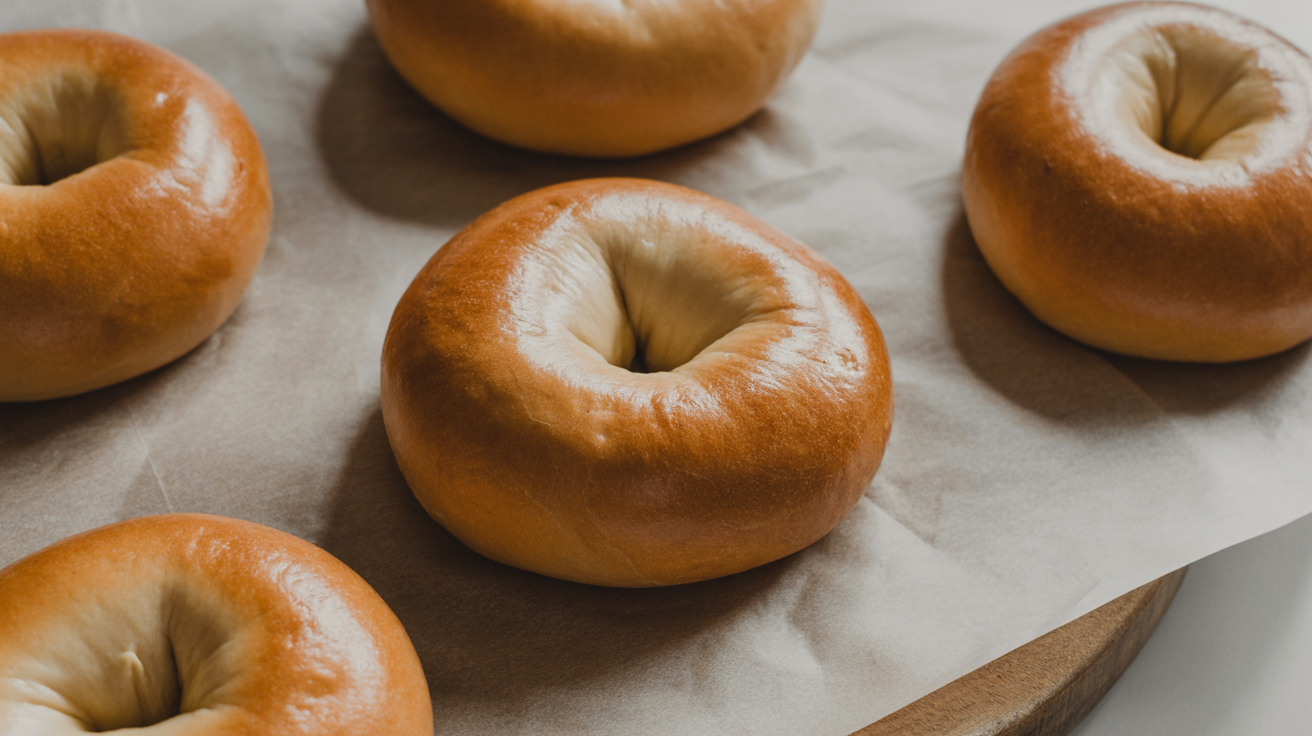
Bagels are not just rolls with a hole. The texture is distinctive: chewy, slightly dense, with a thin crust that snaps when you cut through it. That texture comes from three deliberate choices.
High-protein flour. Bread flour with 12 to 14 percent protein builds a tighter gluten network than all-purpose flour. That network gives bagels their characteristic chew. If you can find bread flour labeled "high-gluten," use it. Regular bread flour works well for most home bakers.
Low hydration. A bagel dough is noticeably stiffer than sandwich bread or focaccia dough. Most bagel recipes run around 55 to 60 percent hydration (grams of water per 100 grams of flour). That stiffness is what lets the dough hold its ring shape through proofing and boiling without spreading flat.
The boil. Before baking, bagels go into a pot of simmering water for 30 to 60 seconds per side. The heat sets the outer skin, limits oven spring, and creates that signature chew. Adding barley malt syrup or honey to the boiling water adds a subtle sweetness and helps the crust brown.
If you enjoy working with yeasted doughs, this same flour-and-hydration thinking applies when you make soft sandwich bread or dinner rolls, though those doughs are much softer and more forgiving to handle.
Ingredients and Ratios
This bagels from scratch recipe makes 8 bagels. Weights are more reliable than cups, but both are listed below as starting points.
| Ingredient | Grams | Approximate Volume | Baker's % |
|---|---|---|---|
| Bread flour (12-14% protein) | 500 g | 4 cups | 100% |
| Water (room temp, ~70°F/21°C) | 290 g | 1 1/4 cups | 58% |
| Instant yeast | 7 g | 2 1/4 tsp | 1.4% |
| Salt | 10 g | 1 3/4 tsp | 2% |
| Barley malt syrup (or honey) | 14 g | 2 tsp | 2.8% |
For the boiling water:
- 3 liters (about 3 quarts) water
- 2 tablespoons barley malt syrup or honey
- 1 tablespoon baking soda (optional; deepens the crust color slightly)
Optional toppings: sesame seeds, poppy seeds, everything bagel seasoning, coarse salt. Have them ready in a shallow dish before you begin boiling.
A note on barley malt syrup: it is sold at homebrew shops and many grocery stores. Honey is a practical substitute with a slightly different flavor. Do not skip the sweetener entirely in the boiling water; it noticeably affects both color and texture.
Mixing and Shaping the Dough
Mixing
Combine the flour, yeast, salt, and malt syrup in a large bowl. Add the water and mix until no dry flour remains. The dough will feel stiff and rough compared to most bread doughs. That is normal and expected.
Knead for 8 to 10 minutes by hand, or 6 to 8 minutes in a stand mixer with the dough hook on medium-low speed. The goal is a smooth, somewhat tacky dough that passes the windowpane test: a small piece stretched between your fingers should thin out enough to let light through without tearing. Because the hydration is low, this takes more effort than softer doughs, but the dough does smooth out.
Shape the dough into a ball, cover the bowl, and let it rise at room temperature until roughly doubled, about 60 to 90 minutes depending on kitchen temperature.
Shaping the Rings
Divide the dough into 8 equal pieces, roughly 103 grams each. Roll each piece into a smooth ball, then let them rest uncovered for 5 minutes. That brief rest relaxes the gluten and makes shaping considerably easier.
To shape each bagel, poke your thumb through the center of a dough ball and stretch the ring with your fingers until the hole is about 2 inches across. It will shrink somewhat during proofing and boiling, so err on the side of a larger hole. Alternatively, roll each ball into a rope about 9 inches long, then press the ends together firmly around your hand to form a ring.
Place the shaped bagels on a parchment-lined sheet pan lightly dusted with semolina or cornmeal to prevent sticking. Cover loosely with plastic wrap and proof for 20 to 30 minutes at room temperature.
Cold proof option: after shaping, refrigerate the bagels uncovered for 8 to 16 hours. Cold proofing builds more flavor and gives you flexibility with timing. Pull them straight from the refrigerator into the boiling water; no need to bring them to room temperature first.
The Boil
Bring the pot of water, malt syrup, and baking soda to a brisk simmer (not a rolling boil; too vigorous a boil can deform the bagels). Preheat your oven to 450°F (230°C) at the same time.
Lower 2 to 3 bagels at a time into the simmering water. Boil 30 seconds per side for a thinner, slightly crisper crust. Boil up to 60 seconds per side for a chewier, thicker result. Use a slotted spoon or spider strainer to flip and remove them.
If you are adding toppings, dip or press each boiled bagel into the seeds or seasoning immediately after it comes out of the water. The wet surface picks up toppings well; once the surface dries, they will not stick.
Return the topped bagels to the sheet pan. If any have puffed so much that the hole looks like it may close during baking, gently stretch it open again with a finger.
Baking Bagels and Adding Toppings
Bake at 450°F (230°C) on the middle rack for 18 to 22 minutes, rotating the pan once at the halfway point, until the bagels are a deep golden brown. A pale bagel will be doughy inside. You want real color on these.
Transfer to a wire rack and wait at least 10 minutes before cutting. The interior continues to set as the bagels cool.
When to apply each topping:
- Sesame seeds, poppy seeds, everything bagel seasoning, dried onion: apply to wet boiled bagels, before they go into the oven
- Coarse sea salt: apply to wet boiled bagels, before baking
- Cream cheese, lox, sliced tomato, or any cold topping: apply after the bagels have cooled completely
Storage: bagels are at their best within a few hours of baking. For longer storage, slice them in half and freeze; toast directly from frozen rather than letting them stale on the counter. Once you are comfortable with a plain bagel, the same dough handles mix-ins like cinnamon and raisins (fold in about 100 g of raisins after kneading) or jalapeño and shredded cheddar (fold in before the first rise).
If you want to explore other beginner-friendly yeasted projects, focaccia makes a good contrast: high hydration, no shaping stress, completely different result from the same basic ingredients.
Frequently Asked Questions
Can I use all-purpose flour instead of bread flour? You can, but the texture will be softer and less chewy. All-purpose flour typically has around 10 to 11 percent protein compared to 12 to 14 percent in bread flour. The dough will also feel slightly stickier at the same hydration. If that is what you have, the bagels will still taste good; just expect a more tender crumb.
Why did my bagels come out flat? Flat bagels usually mean the rings were shaped with holes that were too small, so they sealed up during proofing or boiling and collapsed as gas expanded with nowhere to go. Make the holes larger than you think you need during shaping. Overproofing can also cause spreading, so stick to the 20 to 30 minute proof window before boiling.
Can I skip the boiling step? Technically yes, but the result will be closer to a baked bread roll with a hole. The boil is what creates the signature skin and chew. It takes about 5 minutes total and is worth doing.
My dough feels too stiff to knead. Is something wrong? Probably not. A 58 percent hydration dough is noticeably firmer than most home bakers are used to. Push through the first 2 to 3 minutes; the gluten will start to develop and the dough will smooth out. If it truly crumbles and will not come together, add water 1 tablespoon at a time until it forms a cohesive mass.
How do I know when the dough is ready to boil? Drop one bagel into a glass of cold water. If it floats within about 10 seconds, the dough has enough gas and is ready for the pot. If it sinks and stays down, give the batch another 10 to 15 minutes of proofing. This float test is more reliable than judging by appearance alone.