Yeasted Breads
How to Shape a Sandwich Loaf for an Even, Tall Rise
Learn how to shape sandwich bread for an even, tall rise using the rectangle-roll method, proper seam sealing, and the right dough weight for your pan.
Shaping a sandwich loaf well takes about two minutes, but those two minutes determine whether your bread rises straight and tall or bakes up lopsided with a dense crumb. The rectangle-roll method gives beginners a repeatable technique that works every time.
Why Shaping Matters for a Pan Loaf
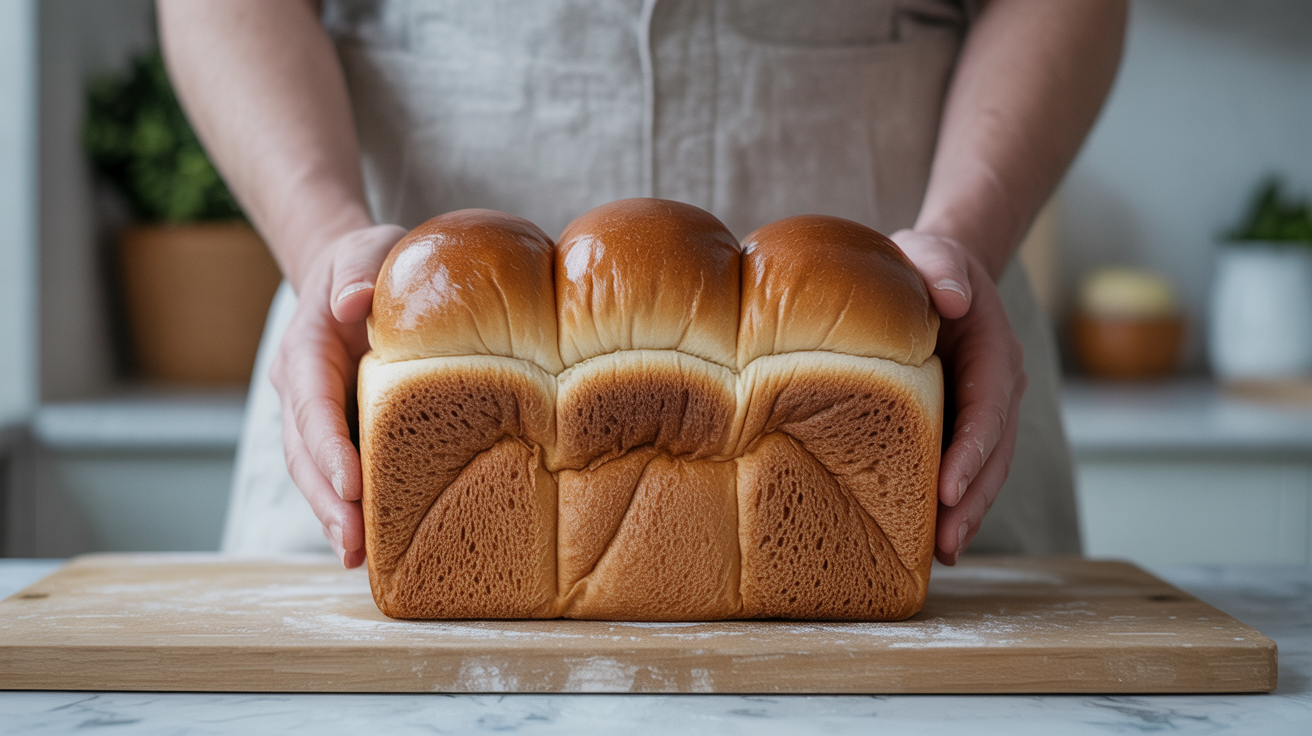
A free-form boule can be a little rough around the edges and still bake fine. A pan loaf has a constraint: it needs to fill the pan evenly from end to end and rise high enough to dome above the rim. If the dough is uneven going in, one end proofs faster, the seam can pop open, and you lose the smooth, rounded top that makes a good sandwich slice.
Good shaping solves three problems at once.
- It redistributes the gas bubbles so the crumb is even rather than full of large holes near one end.
- It creates surface tension across the top of the loaf, which helps it hold its shape as it proofs.
- A sealed seam keeps the loaf from splitting along the bottom during the oven spring.
For a deeper look at what goes into a soft, tender sandwich loaf from start to finish, the guide on how to make soft sandwich bread at home walks through the full process.
Matching Dough Weight to Pan Size
One of the most common reasons a loaf turns out short and flat is putting too little dough in the pan. Too much and the dough overflows; too little and it never rises above the rim and you get a squat, brick-shaped result.
The standard ratio is roughly 35 to 40 grams of dough per 100 cm² of pan volume for a typical enriched sandwich dough. The table below gives practical starting weights for the most common pan sizes. These are starting points; your specific recipe hydration and enrichment level can shift things by 50 to 75 grams.
| Pan size (L x W x H) | Approximate dough weight |
|---|---|
| 20 x 10 x 6 cm (8 x 4 x 2.5 in) | 500 to 550 g |
| 23 x 13 x 7 cm (9 x 5 x 3 in) | 700 to 800 g |
| 25 x 10 x 7 cm (10 x 4 x 3 in) | 750 to 850 g |
| 30 x 10 x 7 cm (12 x 4 x 3 in) | 900 to 1000 g |
Weigh your dough before you shape it. If you are baking two loaves from one batch, divide by weight, not by eye.
The Rectangle-Roll Method, Step by Step
This is the most reliable technique for beginners because it does not require any guesswork about tension. You build structure by rolling rather than by hand-forming.
1. Degas the dough gently
Turn the bulk-fermented dough out onto a lightly floured surface. Do not punch it aggressively. Press it flat with your palms using steady, even pressure, working from the center outward. The goal is to release the large, uneven gas pockets without exhausting every bubble. A dough that has been moderately degassed will bake up with a fine, even crumb. One that has been hammered will be dense and tight.
2. Shape into a rectangle
Use your hands or a rolling pin to coax the dough into a rectangle. The width of the rectangle should match the length of your pan. The length of the rectangle can be 25 to 30 cm; it does not need to be precise. Keep the thickness as even as you can, around 1.5 to 2 cm. Uneven thickness at this stage causes the loaf to rise unevenly in the pan.
3. Roll it up tightly
Starting at the short end nearest you, roll the dough toward the far end. Keep the roll snug but not so tight that the dough tears. A loose roll leaves air gaps in the interior; a roll that tears weakens the surface tension you are trying to build. Aim for a firm, even cylinder.
4. Seal the seam
When you reach the end of the roll, pinch the seam closed along the entire length of the cylinder. Use your fingertips to press and drag the edge of the dough into the surface beneath it. You can also use the heel of your hand to press the seam down along a flat surface. The seam needs to be properly closed; if it is just laid against itself, it will gap open during baking and leave a ridge along the bottom of the loaf.
5. Tuck the ends
Fold each end of the cylinder under, pressing to seal. This keeps the ends of the loaf from gaping open. Some bakers skip this step, but it takes ten seconds and makes a visible difference in the finished shape.
6. Place seam-side down in the greased pan
Lower the shaped loaf into the pan with the seam facing down. Press it gently so it sits flat and fills the pan end to end. If the loaf is shorter than the pan, press it lengthwise to elongate it slightly before placing. The top surface should be smooth and taut.
Proofing: When to Bake
The shaped loaf needs a final proof before it goes in the oven. For most enriched sandwich doughs, the right point to bake is when the dough has risen to just above the rim of the pan, roughly 1 to 2 cm above it.
How to judge readiness
Press the dough lightly with a floured fingertip. If the indentation springs back quickly and completely, the dough needs more time. If it springs back slowly, leaving a slight impression, it is ready. If it does not spring back at all, it is over-proofed.
Over-proofed dough will collapse in the oven rather than rise. Under-proofed dough will spring up, sometimes dramatically, but can tear along the sides or develop an open, uneven crumb. The poke test is not perfect, but it is a reliable enough guide for beginners.
Cover the pan during proofing
Drape a piece of plastic wrap or a damp towel loosely over the pan. A dry skin on the surface prevents the dough from expanding smoothly and can cause cracking. If you use plastic wrap, oil the underside lightly so it does not stick to the dough if it touches.
Proof time varies with room temperature. At around 22 to 24°C, expect 60 to 90 minutes. Cooler kitchens will take longer. You can also do a cold proof overnight in the refrigerator, which slows fermentation and develops more flavor. A cold-proofed loaf goes directly from the fridge into a preheated oven.
Common Shaping Mistakes and How to Fix Them
The seam splits during baking. The seam was not sealed well enough. Spend an extra 30 seconds pressing and dragging the seam closed. Place it firmly against the bottom of the pan so the weight of the dough holds it shut during proofing.
One end rises higher than the other. The rectangle was uneven in thickness before rolling, or the dough was not spread to the full width of the pan. Check that the rolled-up cylinder is even in diameter before placing it.
The loaf rises but then collapses in the oven. This is almost always over-proofing. Pull the loaf, let it cool, and use it for toast. Next bake, reduce proof time by 15 to 20 minutes and apply the poke test before deciding it is ready.
The top tears along the sides. The loaf was under-proofed or the oven temperature was too high, causing rapid, uneven oven spring. Give the loaf more proof time and check your oven thermometer if you have one.
For other yeasted doughs that benefit from careful shaping, the guide on easy homemade dinner rolls for beginners covers shaping techniques for smaller pieces of dough. For a completely different approach where shaping is minimal, how to make focaccia, a foolproof beginner's recipe is a good next bake.
Frequently Asked Questions
Do I need to flour the surface heavily when shaping?
Use just enough flour to prevent sticking. Too much flour on the work surface gets incorporated into the roll and can leave dry streaks in the crumb, or prevent the seam from sealing properly. A light dusting is enough for most doughs. If the dough sticks badly even on a lightly floured surface, it may need a few extra minutes of rest to relax after bulk fermentation.
Can I use the rectangle-roll method for sourdough sandwich loaves?
Yes. The shaping technique is the same regardless of leavening. Sourdough sandwich dough is often a little more extensible and less sticky than a yeast-leavened enriched dough, so it can handle the rolling easily. The main difference is the timing of bulk fermentation and final proof, not the shaping itself.
My pan is larger than my recipe calls for. Should I stretch the dough to fit?
Do not stretch the shaped loaf to fit a pan that is too large for the dough weight. A stretched loaf will deflate and bake flat. Either use a smaller pan or increase the recipe to hit the weight range in the table above. Dough weight is the variable to adjust, not the shaping.
How tight should the roll be?
Tight enough that there are no visible air gaps when you look at the cut ends of the cylinder, but not so tight that the surface tears. If you see the dough starting to tear, you are rolling too hard. Relax your pressure and let the dough come with you rather than forcing it.
Can I shape the loaf the night before and bake it in the morning?
Yes. Shape the loaf, place it seam-side down in the greased pan, cover it tightly with plastic wrap, and refrigerate it overnight. The cold slows fermentation. In the morning, take the pan out of the refrigerator and bake it straight from cold, adding a few minutes to the baking time. This is one of the more convenient ways to have fresh bread at breakfast without waking up early to wait through a proof.