Tools & Ingredients
How to Use a Banneton (and What to Do Without One)
Learn how to use a banneton proofing basket step by step, plus DIY alternatives that work just as well for beginner bread bakers.
A banneton proofing basket gives a shaped loaf something to lean against while it rises, so it holds a round or oval shape and develops that signature spiral pattern on the crust. You do not need one to bake good bread, but knowing how to use one properly will keep your dough from spreading flat during the final proof.
What a Banneton Actually Does
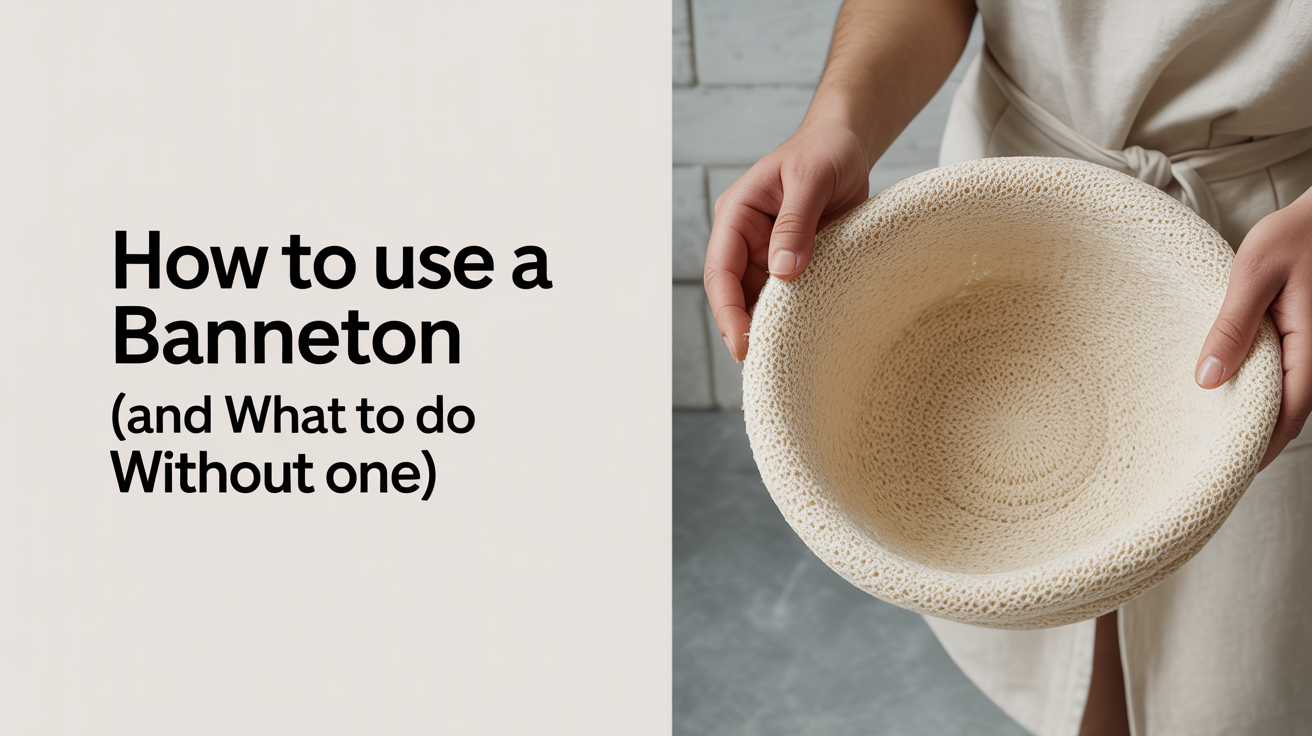
A banneton (also called a proofing basket or brotform) is a coiled rattan or cane basket lined with cloth or bare rattan. It has two jobs: support and moisture management.
Support: After you shape a loaf, gluten tension pulls the dough inward but does not hold it up from underneath. Without a container, slack or high-hydration doughs spread sideways as they rise. A banneton cradles the sides so the dough rises upward instead.
Moisture wicking: The porous rattan draws surface moisture away from the dough. That slight drying builds a thin skin that holds the loaf together when you turn it out and score it. A dry surface also helps the blade cut cleanly.
The spiral pattern on a rustic sourdough boule comes from the rings of rattan pressing into the floured surface during proofing. It is purely cosmetic but has become the visual shorthand for "I made this from scratch."
Sizes and Shapes to Know
Bannetons come in round and oval (batard) shapes, and in several sizes. Too large and the dough spreads to fill the basket, losing its ear. Too small and the dough climbs over the rim.
| Basket size | Dough weight | Loaf shape |
|---|---|---|
| 500 g round | 300-400 g dough | Small boule |
| 750 g round | 500-700 g dough | Standard boule |
| 1 kg round | 700-900 g dough | Large boule |
| Oval / batard | 500-850 g dough | Long oval loaf |
Most beginner recipes yield 700-900 g of dough, which fits a 750 g or 1 kg round basket. When in doubt, go a size up.
Working in grams makes matching dough weight to basket size straightforward. If you are still using volume measurements, a kitchen scale removes the guesswork.
How to Prep and Use a Banneton
Season a New Basket Before You Use It
A brand-new rattan banneton needs to build up a layer of flour in its surface pores before it releases dough cleanly. Skip this step once and the first loaf may weld itself to the basket.
- Lightly mist the inside of the dry basket with water from a spray bottle.
- Dust generously with rice flour, tapping and rotating until every cane is coated.
- Let it air-dry completely, at least a few hours or overnight.
- Repeat steps 1-3 one or two more times before the first use.
After those initial seasonings, the basket builds a natural non-stick surface. From then on, a fresh dusting of rice flour before each bake is all it needs.
Why Rice Flour (Not All-Purpose)
Rice flour is the standard choice for banneton prep because it contains almost no gluten. Wheat flour can get pasty when it absorbs moisture from the dough, and that paste binds the loaf to the basket. Rice flour stays dry and powdery even when slightly damp, so it forms a reliable release layer.
A 50/50 mix of rice flour and bread flour works if pure rice flour is hard to find. Keep a small jar of it next to your banneton so dusting before each use takes about ten seconds.
(Curious about how flour types behave in bread dough? Bread flour versus all-purpose flour covers the key differences.)
Placing the Dough: Seam Up
After shaping, place the dough into the banneton seam side up. This is the step that confuses most beginners because it feels backward.
Here is the logic: the seam is the weak point where you pinched the dough together during shaping. When you flip the banneton over a baking surface, the seam lands face-down on the parchment or Dutch oven. The tight, smooth surface of the dough ends up on top, where scoring and oven spring happen.
If you place the dough seam-down in the banneton, you will flip it onto your baking surface seam-side up, the seam can tear open unpredictably in the oven, and you lose control of where the loaf expands.
Proofing Time and Temperature
Once the dough is in the basket, cover it loosely with a shower cap, reusable plastic bag, or cling film and proof it either at room temperature or in the refrigerator.
- Room temperature proof: 1 to 3 hours at roughly 70-75°F (21-24°C). The dough is ready when it has grown noticeably, springs back slowly when poked, and feels slightly airy.
- Cold retard (refrigerator proof): 8 to 16 hours at 38-42°F (3-6°C). Cold proofing develops deeper flavor and firms the dough so it is easier to score. Bake straight from the refrigerator without waiting for it to warm up.
Most beginner sourdough recipes suggest a cold retard because it widens the timing window and tends to produce better oven spring.
Baking sourdough in a Dutch oven traps steam during the first part of the bake and gives the loaf room to expand. If you are not sure about that step, here is a plain look at whether you really need one.
Turning Out and Scoring
Have your baking surface ready before you flip: a parchment-lined Dutch oven, a sheet pan, or a baking stone. Place parchment over the top of the banneton, set a cutting board or plate on top, then flip the whole stack in one motion. Lift the banneton off slowly and the dough should fall cleanly.
Score immediately. Cold dough from the refrigerator is firmer and cuts more cleanly than warm dough.
Cleaning the Basket
Never wash a rattan banneton with water or soap. Wet rattan is slow to dry and damp canes can develop mold.
To clean after each use:
- Let the basket dry fully at room temperature.
- Tap it upside down over a bin to shake out loose flour.
- Use a dry stiff brush to dislodge any dough bits stuck between the canes.
- Store in a dry place with good airflow. Never seal it in plastic while still damp.
If you bake infrequently, dust the basket lightly with rice flour before storing.
Proofing Basket Alternatives That Actually Work
A banneton proofing basket is useful but not essential. Several everyday items can stand in as a proofing basket alternative.
Bowl With a Floured Tea Towel
This is the most common substitute and it works well for both round and oval loaves.
- Choose a bowl with a shape close to the loaf you want (round bowl for a boule, oval bowl for a batard).
- Line it with a clean, lint-free linen or cotton tea towel. Flour sacking or muslin cloth works well. Avoid terrycloth towels because the loops catch in the dough.
- Dust the cloth generously with a rice flour and all-purpose flour mix. The cloth needs to be very well floured; be more generous than you think you need.
- Place the shaped dough seam-up, fold the edges of the towel lightly over the dough, and proof as you normally would.
Flour the cloth before every use. Cloth absorbs moisture from the dough, so an under-floured cloth is the main reason dough sticks.
Colander Lined With a Floured Cloth
A metal or plastic colander works the same way as a bowl but with more airflow. The holes let surface moisture escape, similar to rattan. Use the same cloth-and-flour setup described above.
Loaf Pan for Sandwich Loaves
For any yeasted sandwich loaf, skip the banneton entirely. A standard 9x5-inch loaf pan supports the dough, gives it a uniform shape, and goes straight into the oven. No flipping needed.
What You Lose Without a Banneton
The spiral ring pattern only comes from rattan pressing against floured dough. A bowl-and-towel setup will not replicate that look. The flavor and crumb structure are not affected by what holds the dough during proofing.
Frequently Asked Questions
How do I know which side is up when placing dough in the banneton? Seam side always goes up. The seam is the rough, pinched edge from shaping. When you flip the banneton, the seam lands underneath and the smooth surface ends up on top for scoring.
Can I use regular all-purpose flour instead of rice flour in a banneton? You can, but it is prone to sticking. All-purpose flour absorbs moisture from the dough and can form a paste that glues the loaf to the canes. Rice flour stays dry and releases more cleanly. If rice flour is unavailable, a blend of all-purpose and cornstarch (about 2:1) works better than straight all-purpose.
My dough stuck to the banneton. What went wrong? The most likely causes are under-flouring, using wheat flour that went pasty, or proofing in a basket that was not fully dry from a previous use. For the next bake, apply a heavier coat of rice flour and make sure every part of the basket is dusted, including the floor and the sides near the rim.
Do I need to let a cold-proofed loaf warm up before baking? No. Cold dough is firmer and easier to score. Move it straight from the refrigerator to the hot oven. It may take a few extra minutes to reach full oven spring, but results are typically better than with warm dough.
How often should I re-season my banneton? After the initial seasonings, most baskets only need a fresh dusting of rice flour before each bake. If the basket looks dry and pale after months of use, give it one or two mist-and-flour treatments to restore the surface.