Sourdough
Your First Sourdough Loaf: A Step-by-Step Beginner's Guide
Make your first sourdough loaf with this honest, step-by-step beginner's guide. Includes a full formula, schedule, and troubleshooting tips.
Baking sourdough bread for beginners can feel like an enormous project, but it really comes down to four things: a healthy starter, flour, water, salt, and a bit of patience. Once you run through the process once, the steps start to click together in a satisfying way.
This guide walks you through a realistic two-day beginner sourdough recipe from start to finish. Day one is mostly hands-off. Day two is a quick bake in the morning. By lunch, you will have a real sourdough loaf cooling on your counter.
Before You Start: What You Actually Need
You do not need a lot of equipment. A kitchen scale is the most important tool here because baking by weight is far more reliable than measuring by volume. You will also need a large mixing bowl, a bench scraper (or a dough cutter), a Dutch oven, and a proofing basket (banneton). A proofing basket lined with a floured cloth works fine if you do not have a banneton.
The one thing you absolutely cannot skip is an active, ripe sourdough starter. A starter that was fed two days ago and has been sitting in the fridge will not give you the lift you need. If your starter is sluggish or you are not sure it is ready, read through how to feed and maintain a sourdough starter before mixing your dough. And if yours refuses to rise no matter what you try, troubleshooting a sourdough starter that is not rising covers the most common culprits.
The Formula
This easy sourdough bread recipe uses a 75% hydration dough. That means the water weight is 75% of the flour weight. It produces an open, chewy crumb that is forgiving enough for a first loaf.
| Ingredient | Grams | Approximate cups |
|---|---|---|
| Bread flour | 500g | 4 cups (loosely scooped) |
| Water (room temperature) | 375g | 1½ cups + 2 tbsp |
| Active starter | 100g | scant ½ cup |
| Fine sea salt | 10g | 1½ tsp |
Total dough weight: about 985g. This makes one 900g boule (oval or round loaf).
The flour and water columns above are a guide. Always weigh ingredients. Cup measures vary too much to be reliable for bread.
Step 1: Check That Your Starter Is Ripe
Your starter should be at or just past its peak rise before you mix the dough. A quick check is the float test: drop a small spoonful of starter into a glass of water. If it floats, it is full of gas bubbles and ready to use. If it sinks immediately, it needs more time.
At room temperature around 70-75°F (21-24°C), a starter fed with equal parts flour and water usually peaks in 4-8 hours. If yours peaks in 12 hours or more, it may need a few refreshes to get back up to speed. A separate guide on making a sourdough starter from scratch explains how to establish and strengthen one if yours is brand new.
Step 2: The Levain and Autolyse
For this first sourdough loaf, you will use your mature starter directly rather than building a separate levain. This simplifies the process without sacrificing flavor.
Mix the dough:
- Combine 375g water and 100g starter in your large bowl. Stir until the starter is mostly dissolved.
- Add 500g bread flour. Mix until no dry flour remains. The dough will look shaggy and rough.
- Cover the bowl and let it rest for 30-45 minutes. This rest is called autolyse. The flour absorbs the water and gluten starts to develop on its own, with no kneading required.
- After the rest, sprinkle 10g salt over the dough. Add a small splash of water (about 10g) to help it dissolve. Squeeze the salt into the dough with your fingers until fully incorporated.
Step 3: Bulk Fermentation and Stretch-and-Folds
Bulk fermentation is the long first rise. The dough sits at room temperature while the starter works through it, building flavor and structure. This stage takes 4-6 hours at 75°F (24°C). A warmer kitchen shortens it; a cooler kitchen lengthens it.
During the first two hours, you will do a series of stretch-and-folds to build dough strength. Here is how to do one set:
- Wet your hand so the dough does not stick.
- Grab one side of the dough, stretch it up as far as it will go without tearing, and fold it over the center.
- Rotate the bowl 90 degrees and repeat.
- Do this four times total, rotating around the bowl.
Perform four sets of stretch-and-folds, one set every 30 minutes during the first two hours. After that, leave the dough alone.
How to tell bulk fermentation is done: The dough should be visibly puffy, domed slightly at the top, jiggling like gelatin when you shake the bowl, and about 50-75% larger than when you started. Do not go by clock time alone. A cool kitchen (68°F / 20°C) may need 7-8 hours. A warm kitchen (80°F / 27°C) may be done in 3.5.
Step 4: Shaping
Shaping sounds intimidating but you only need to build enough surface tension to hold the loaf together during the final proof.
- Turn the dough out onto a clean, unfloured surface (a very lightly floured surface also works, though no-flour shaping gives better tension).
- Fold the top of the dough down toward the center, then fold in the sides, then roll it toward you like a log. Flip it over seam-side down.
- Use a bench scraper in one hand to drag the ball toward you with a short, firm pull. This tightens the bottom skin of the dough. Do this a few times until the surface feels taut and smooth.
- Let the shaped dough rest on the counter uncovered for 20-30 minutes. This is called the bench rest.
- Dust your banneton generously with rice flour or a mix of rice flour and bread flour. Place the dough seam-side up into the banneton. Fold the top edges over the seam to close it.
Step 5: The Cold Proof (Overnight Refrigeration)
Cover the banneton with a shower cap or plastic bag and place it in the refrigerator for 8-16 hours. Cold retardation slows fermentation, develops flavor, and firms the dough so it holds its shape and scores cleanly.
This is where the two-day schedule pays off. You shape the dough in the evening and bake it in the morning.
Sample schedule:
| Time | Step |
|---|---|
| 8:00 AM | Feed starter |
| 2:00 PM | Mix dough (autolyse starts) |
| 2:45 PM | Add salt |
| 3:00-5:00 PM | Four sets of stretch-and-folds |
| 5:00-8:30 PM | Dough rests, bulk fermentation finishes |
| 8:30 PM | Preshape, bench rest, final shape |
| 9:00 PM | Dough goes into fridge |
| Next morning 7:00 AM | Preheat Dutch oven |
| 8:00 AM | Score and bake |
Step 6: Scoring and Baking in a Dutch Oven
Preheat your oven to 500°F (260°C) with your Dutch oven inside for at least 45-60 minutes. The Dutch oven traps steam from the dough during the first part of the bake, which keeps the crust soft and lets the loaf expand. This mimics the steam-injected deck ovens used in professional bakeries.
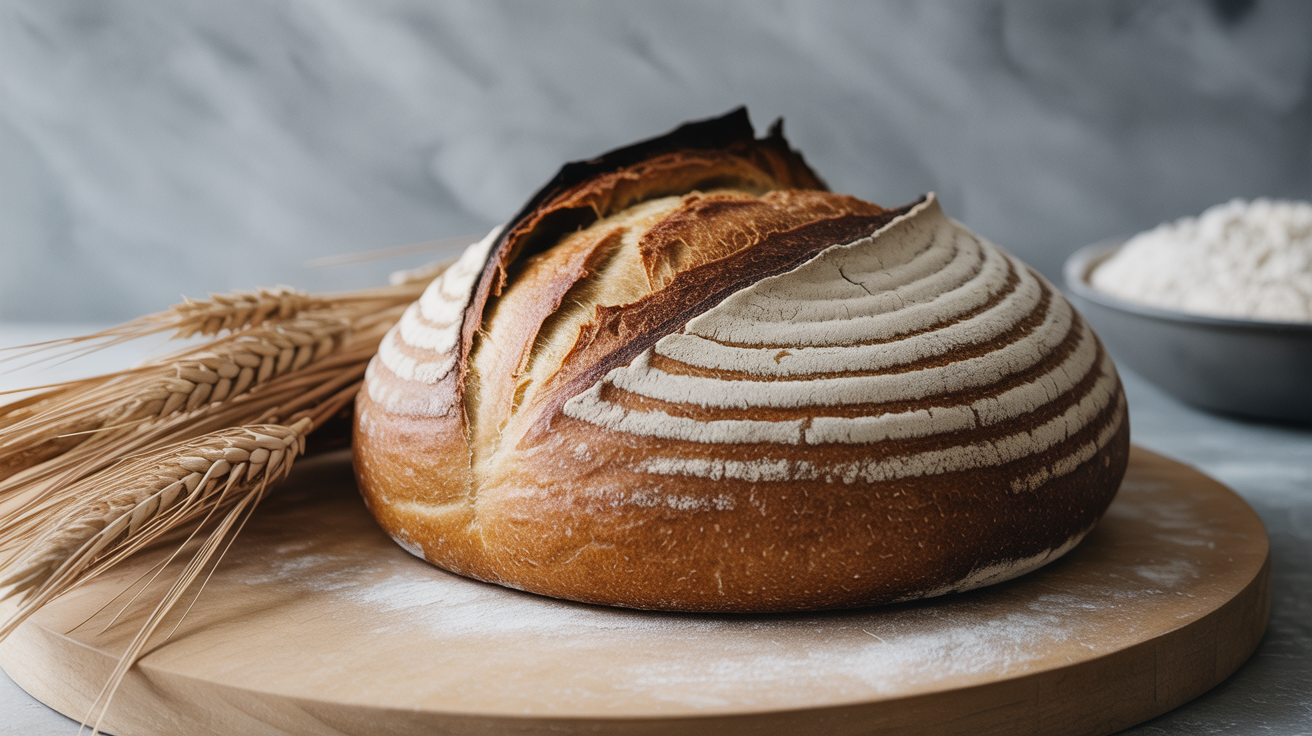
Scoring: Take the dough straight from the fridge. Cold dough scores more cleanly than room-temperature dough. Turn it out onto a piece of parchment paper. Use a bread lame or a sharp razor blade to score a curved line about half an inch (1.2cm) deep at a 30-45 degree angle across the top. This controls where the bread opens. A single score is enough for your first loaf.
Baking:
- Carefully lift the parchment and dough and lower them into the screaming-hot Dutch oven. Put the lid on.
- Bake covered at 500°F for 20 minutes.
- Remove the lid, drop the temperature to 450°F (230°C), and bake for another 20-25 minutes until the crust is a deep mahogany brown.
- Pull the loaf out and cool it on a wire rack for at least one hour before slicing. Cutting too early releases trapped steam and turns the crumb gummy.
The internal temperature should be around 205-210°F (96-99°C) when done. A probe thermometer is useful here but not required. Trust the color.
Frequently Asked Questions
Why is my sourdough bread dense and flat?
The most common reason is under-fermented dough. If bulk fermentation was cut short because you went by the clock instead of watching the dough, the yeast did not build enough gas. A starter that is not fully active is the second most common cause. Make sure your starter doubles reliably within 4-8 hours of a feeding before you use it.
Can I use all-purpose flour instead of bread flour?
Yes. All-purpose flour (about 10-11% protein) will work, though the dough will be a bit more slack and the crumb slightly less chewy than with bread flour (12-13% protein). Reduce the water to 350g if you switch to all-purpose and the dough feels too loose during shaping.
My dough is incredibly sticky. What did I do wrong?
Sticky dough during mixing is normal. The dough should tighten up noticeably after the stretch-and-fold sets. If it is still very sticky after bulk fermentation, the dough may be over-fermented (over-proofed in bulk), which breaks down gluten. Also make sure you weighed the water carefully rather than eyeballing it. A small overage makes a big difference.
Do I have to bake it straight from the fridge?
You do not have to, but cold dough is much easier to score cleanly and holds its shape better going into the hot Dutch oven. Room-temperature dough goes slack quickly and the score can close up before the oven spring pushes it open. Baking from cold is the standard for good reason.
How do I know if the loaf is actually done baking?
Tap the bottom of the loaf. A hollow sound means it is done. The crust should be a rich brown, not tan. An internal temperature of 205-210°F (96-99°C) confirms it. If your oven runs hot and the crust darkens quickly but the center is still underbaked, drop the temperature to 430°F (220°C) and add 5-10 more minutes.